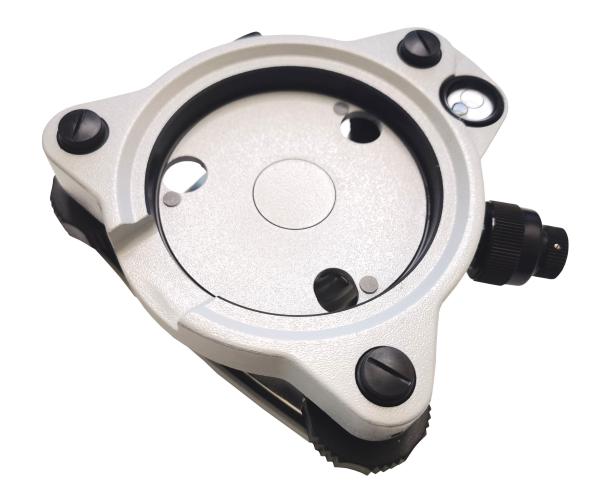
AJ10-D2 Sokkia Type Tribrach with Optical Plummet for Survey
Equipments
Model: AJ10-D2
Specifications
| Model | AJ10-D2 |
| Color | Grey |
| Optical Plummet | Yes |
| Weight | 870g |
| Material | Aluminum |
| Package | Individual Box Package |
| Accuracy | Torsional stiffness <2" |
| Type | Survey Instrument Accessory |
| Bubble | 8' Circular Bubble |
| Used For | All motorized instruments |
Introduction:
Grey tribrach withOptical Plummet
Sokkia style
With locking forced-centering knob
5/8*11 base
8-minitue circular vial
The tribrach and optical plummet are of robust construction and
suitable for long period exposure in all environments.
Tribrach
A tribrach is an attachment plate used to attach a surveying
instrument, for example a theodolite, total station, GNSS antenna
or target to a tripod. A tribrach allows the survey instrument to
be repeatedly placed in the same position over a surveying marker
point with sub-millimetre precision, by loosening and re-tightening
a lock to adjust the instrument base in a horizontal plane.
Tribrach Adjusting
Optical Plummet Adjustment Using: Tribrach Adjusting Cylinder or
Tribrach Adjuster
EQUIPMENT NEEDED: Tribrach Adjusting Cylinder or Tribrach Adjuster, Tripod or
instrument stand, 2 tribrachs, target
1. Place the tribrach on the tripod. Put the adjuster in the
tribrach. Place the tribrach to be adjusted on top of the adjuster
so that it is upsidedown looking at the target on the ceiling. The
distance between the tribrach and target should be between 4 and 5
feet.
2. Using the leveling screws of the bottom tribrach, point the
crosshair of the tribrach being tested to coincide with the target.
3. Rotate the tribrach being tested 180 degrees on the adjuster.
Crosshairs will stay on the target of an adjusted tribrach.
4. After 180 degree turn if the crosshair does not stay on the
target, half the error should be corrected with the adjusting
screws provided by the manufacturer of the tribrach. The remainder
should be corrected with the leveling screws of the bottom
tribrach.
5. Repeat steps 2, 3 & 4 until the crosshair stays on target at all
positions.
Tribrach Circular Vial Adjustment Using: Tribrach Adjuster
EQUIPMENT NEEDED: Tripod or instrument stand, Tribrach Adjuster and adjusting pins.
1. Place the tribrach on the tripod and fasten to the tripod.
2. Place the adjuster in the tribrach and level the tribrach using
the vial on the adaptor. Ignore the circular vial on the tribrach.
3. To level the Adjuster: Point one end of the adaptor vial to any
leveling screw and using that screw bring the vial to center.
4. Now turn the adjuster 90 degrees so that each end of the vial is
as close as possible to the other two leveling screws. Using these
two leveling screws, center the vial.
5. Turn the vial 90 degrees back to the original leveling screw and
level again if necessary.
6. Repeat 1,2 & 3 until the vial remains centered at both
positions.
7. To test the adjustment of the adjuster vial at any centered
position, rotate the adjuster 180 degrees. The vial should stay
centered within one graduation. If not, take half the error back to
the center with the vial mounting screw that is on the high side.
8. If the circular vial on the tribrach is not centered, use the
adjusting screws and bring to center.


